Launched on October 9, 2024, no-code tuning simplifies the process of tuning a text generation model for those looking to take an open source text generation model (as Gemma – 2B in the example) to create custom, high-performing, and secure solutions that align with their specific needs, industries, and brand voice.
Why would you want to tune an AI model?
- Customization and Specificity: Tuning text generation AI models allows business to create industry-specific, brand-consistent, and personalized content, enhancing relevance, professionalism, and customer satisfaction.
- Improved Performance and Accuracy: Fine-tuning AI models for specific tasks, reducing data bias, and addressing domain-specific challenges can improve accuracy, ethical output, and effectiveness compared to generic models.
- Cost Optimization: Fine-tuning open-source models provides a cost-effective alternative to expensive commercial models, particularly for specific tasks and businesses with budget constraints.
- Control and Security: By fine-tuning a model on a company’s specific data, they can control the model’s output and reduce the potential for security breaches or unintended consequences.
Fine-tuning AI models for specific tasks and industries allows companies to create unique AI capabilities that differentiate them from competitors, drive innovation, and solve unique challenges.
Here are the steps to fine-tuning a text generation model on the Qubrid AI
- No-code tuning is available in the model page. In the model page you have the ability to “Run Model” and test it using the provided interface.
- You can navigate to the model page from the Qubrid AI Home → Model Studio → Select Model type → Select the desire model (Gemma-2B) in this example
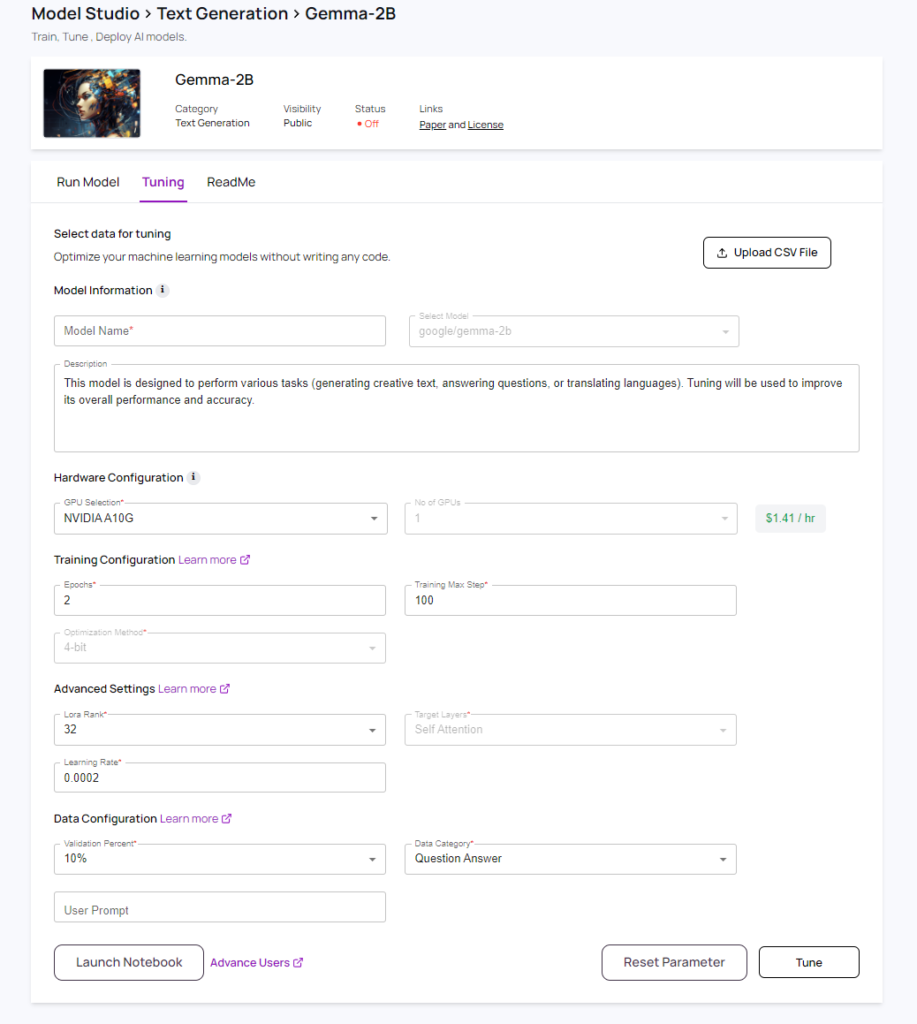
- Once you are in the model page you can navigate to no-code tuning by selecting “Tuning” tab

- The model tuning page will provide every user with
- No-code tuning
- Pro-code tuning (suitable for advance users with programming background)
- The page consists of and users can opt for default values already pre-selected or make changes as needed. The following steps need to be competed to successfully tune a model
Get Started

- Model Name and Description: These is an user input field. The tuned models will be listed in the “Dashboard” and will be sorted based on the name.

- Selecting Data for Tuning:
- This is a critical step in the tuning process. Quality data results in quality tuned model. The data file has to be a CSV (comma separated value). The quality of data used to fine-tune an AI model is crucial for achieving optimal performance and preventing bias. Users should consider the following factors when preparing and cleaning their data:
- Relevance: The data should be directly relevant to the specific task or domain you’re fine-tuning the model for. Irrelevant data can lead to confusion and hinder performance.
- Quantity: A sufficient amount of data is necessary for the model to learn effectively. However, more data doesn’t always equate to better performance. Ensure the data is diverse and representative of the real-world scenarios the model will encounter.
- Accuracy: Data should be accurate and free from errors. Inconsistent formatting, missing values, or incorrect labels can introduce bias and negatively impact the model’s performance.
- Diversity: The data should reflect the diversity of the target audience or domain to minimize bias and improve the model’s generalizability.
- Consistency: Data should be formatted consistently, with clear and unambiguous labels. This ensures the model can process the data correctly and avoids potential errors.
- Cleanliness: Preprocess and clean the data to remove noise, outliers, and irrelevant information. This helps improve the model’s accuracy and efficiency.

- Selecting GPU configuration Hardware Configuration: Users can configure the GPU resources they want to use for training, including the GPU type (NVIDIA A10G) and the number of GPUs. Based on the selection a per hour price will be displayed next to the GPU selection.

4. Training Configuration: Users can set parameters for the training process. All the configuration selection will impact the tuned model.
- Epochs: The number of times the model iterates over the training data.
- Epochs represent a full pass of the entire training dataset through the model. The model updates its parameters based on the errors it encounters during each epoch.
- More Epochs = More Learning: More epochs usually lead to better model performance, as the model has more opportunities to learn from the data. However, excessive epochs can lead to overfitting, where the model memorizes the training data and performs poorly on unseen data.
- Finding the Right Balance: The optimal number of epochs depends on the complexity of the model, the size of the dataset, and the learning rate. Start with a smaller number of epochs and observe the model’s performance on validation data.
- Optimization Method: Also know as Quantization. AI model quantization is a technique used to reduce the size of a deep learning model, making it more efficient and faster to run. Quantization during tuning is Quantization-Aware Training and the tuning of model is done with quantization in mind, allowing the model to adapt to the lower precision during training. Quantization often involves a trade-off between model size and accuracy. Carefully evaluate the accuracy impact of different quantization levels.
- Select the appropriate quantization setting.
- Training Max Steps: The maximum number of steps for training. Higher max steps improves performance by allowing more iterations, but may lead to overfitting. Fewer steps reduce overfitting risk but can result in under-training, especially with complex tasks or limited data.

- Advanced Settings: Allows users to tune more advanced settings.
- Lora Rank: Lora tuning is a technique for fine-tuning large language models (LLMs) efficiently. It involves adding a small, trainable “adapter” network to the pre-trained model, which learns to adjust the model’s outputs for a specific task. The rank of this adapter network plays a crucial role in shaping the output model:
- Lora Rank and its Impact:
- Lora Rank: Set the rank for Low-Rank Adaptation (LoRA) to optimize the efficiency of fine-tuning by decomposing the weight matrices into multiple smaller rank matrices.
- Higher rank values mean more parameters.
- Increased Rank = More Flexibility: A higher rank allows the Lora adapter to learn more complex relationships within the data and make finer adjustments to the pre-trained model’s behavior.
- Improved Performance: Generally, a higher rank can lead to better performance, especially for tasks that require subtle changes to the model’s output.
- Increased Computational Cost: Higher rank values also mean a larger adapter network, increasing the computational cost of training and inference.
- How Rank Selection Influences Output Model:
- Task Complexity: For simple tasks like modifying the tone of text, a lower rank might suffice. However, for tasks requiring more nuanced changes, a higher rank may be necessary.
- Data Availability: If you have a large dataset, a higher rank might be beneficial for learning complex patterns. With limited data, a lower rank might be sufficient.
- General Guidelines:
- Start Small: Begin with a lower rank (e.g., 4 or 8) and gradually increase it if necessary.
- Experiment and Evaluate: Test different ranks on your specific task and dataset to determine the optimal value.
- Lora Rank and its Impact:
- Learning Rate: The learning rate is a crucial hyperparameter in the training of machine learning models, including during fine-tuning efforts. It dictates how much the model adjusts its internal parameters (weights) with each iteration of training based on the errors it encounters. Think of it as the size of a step taken by the model when trying to improve its accuracy.
- Why does learning rate matter?
- Adjusts Weights: The learning rate determines how much the model modifies its weights during each iteration of training. This modification is based on the difference between the model’s predictions and the actual target values.
- Impacts Convergence: It influences how quickly and effectively the model converges to a good solution, minimizing errors.
- How Learning Rate Impacts Tuning:
- High Learning Rate:
- Pros: Allows the model to learn quickly, potentially finding a good solution rapidly.
- Cons: Can cause the model to jump around the error surface, potentially missing optimal solutions. It may also lead to instability and divergence, where the model’s performance deteriorates during training.
- Low Learning Rate:
- Pros: Offers stability and a higher chance of finding a local minimum of errors.
- Cons: Can slow down the learning process and may take a long time to converge.
- High Learning Rate:
- How to set the Learning Rate:
- Importance: Selecting the right learning rate is crucial for successful model tuning. It significantly impacts performance and training time.
- Trial and Error: Often involves experimentation to find the best value for your specific task and dataset.
- Learning Rate Schedules: These schedules dynamically adjust the learning rate during training, starting with a higher rate and gradually decreasing it as the model converges.
- Why does learning rate matter?
- Target Layers: The “target layers” in a model refer to the specific layers where adjustments or fine-tuning are applied during training. In large language models (LLMs), layers are typically composed of several components, including self-attention layers, feed-forward layers, and more.
- How Target Layers Impact Tuning:
- Fine-tuning specific layer allows the model to learn task-specific patterns. This results in better adaptation, especially for complex tasks. This approach helps balance fine-tuning time and accuracy, making it more efficient without significantly compromising performance.
- Selecting target layers:
- Fine-tuning all linear layers improves task adaptation but requires more time and resources.
- Focusing on specific layers, such as self-attention layers, speeds up training and reduces resource usage.
- How Target Layers Impact Tuning:
- Lora Rank: Lora tuning is a technique for fine-tuning large language models (LLMs) efficiently. It involves adding a small, trainable “adapter” network to the pre-trained model, which learns to adjust the model’s outputs for a specific task. The rank of this adapter network plays a crucial role in shaping the output model:

- Data Configuration: Users can specify the type of data and the percentage of data to use for validation.
- Validation Percent: Users can define what percentage of the dataset is reserved for validation, ensuring the model is validated on unseen data.
- Data Category: Users can choose between two categories: Question Answering (QA), where the dataset contains questions (inputs) and corresponding answers (outputs) in two separate columns, or Non-Question Answering (Not-QA), which can include other types of content, such as multiple input and output columns.
- User Prompt: An instruction provided by the user to guide the model in understanding the relationship between input and output features or columns.
Once you have uploaded the tuning dataset (CSV) and set all the tuning parameters you are ready to start the tuning process. You can choose the no-code tuning option and click the “Tune” button (bottom right) to start the tuning process. If you want more granular control and want access to more advance option you can choose to “Launch Notebook”. This will launch a Jupyter Notebook and a runtime with the model. The notebook will also have sample code to get you started.
Once the no-code tuning process you can monitor the progress in the “Dashboard” page. Here select “Tuned Model” tab. Here you will find all the models you have tuned and in-progress tuning jobs.


